AMT for Linux
Intel AMT is basically an extension that can be found on some CPU/Chipset combinations. Basically it is a controller separate from the regular CPU that can interfere with networking before the host ever receives a packet from the network. On the host side it can provide virtual hardware and has access to the video memory. Furthermore it can interact with the host operating system in a variety of ways to enforce corporate restrictions. The latter is what you probably never need. This leaves you with the following typical use cases:
- Power Control
Power the host system on or off, do a master bus reset (press the reset button remotely). Hanging system? No need to leave your seat. No need for telephone calls.
- Serial Console
Access a serial console over AMT SOL (Serial Over Lan). Comes in handy when you mess up host networking and/or firewalling. Very nice too in case of boot problems.
- VNC
Access e.g. BIOS setup remotely (good for headless systems or cabinet mounted systems with no usb keyboard). No more rack climbing, desk diving or wardrobe crawling.
In my case, I got two fanless HTPCs with bluetooth keyboards and one fanless router and mini server (the one serving the stuff you are currently reading) which is running headless and thus with no keyboard. All of these are either Intense PC or uSVR from CompuLab. Another of these systems running in a remote location is running an Asterisk based PBX. They all do have in common that they are physically not to easy to reach and that the do not have an usb keyboard attached by default. That is where AMT comes in handy when these systems do exhibit problems. A working subsystem that does not depend on a working host operating system and that offers virtual hardware in a way that even the BIOS accepts.
Note: lots of the required stuff mentioned below is available through downloadable packages. If third party software is required the packages do contain build scripts that download, compile and install the required software provided that you run a sufficiently regular system with common prerequisites already installed. The downloadable packages contain code that will compile on Linux only. If you encounter any problems you will have to fix them yourself, I'm not providing any support facilities.
AMT Configuration
BIG FAT Warning: When you have to enter passwords via BIOS, AMT expects you to use an US keyboard. If you use your NLS keyboard, first map all characters you want to enter to the keys to be pressed on an US keyboard. As an alternative you can use a USB US keyboard. If you don't take care of this fact you will run into trouble as the password you enter is required from the host OS lateron. And there you will use your NLS keyboard layout so if you enter the same key sequence in BIOS and host OS with a NLS keyboard you will most probably enter different passwords! BTW, the default password of an unconfigured AMT BIOS is admin.
Check, that your system actually has AMT available. This is true only for certain CPUs (typically some core i5 or i7) in combination with some chipsets (do google if your chipset supports AMT). And, the BIOS manufacturer must have allowed you to access the MEBx BIOS (which is actually the AMT BIOS), e.g. through a BIOS option or by pressing CTRL-P or CTRL-ALT-F1 during POST or by any other means the BIOS vendor has come up with. If your BIOS has an option to enable or disable AMT then set this option to enabled. If you can't find any way to enter the MEBx BIOS your system either doesn't have AMT or it is forcibly disabled by the BIOS vendor.
Setup overview: first of all you need the proper kernel options, i.e. CONFIG_INTEL_MEI and CONFIG_INTEL_MEI_ME. This is the kernel driver to interact with AMT, available from Linux kernel 3.4 or any later kernel. Then you will need the lms daemon which interacts with the kernel and listens on some network ports (at least port 623 and port 16992). Now you can use ACUConfig to configure AMT on the local system.
Basically this sounds easy. Except that the lms daemon as well as ACUConfig don't compile out of the box and that for the binary version of ACUConfig there's actually two versions available, one of which you can't use. To help out a bit there's an amtinstall package in the downloads section that contains a build script that downloads, patches and builds the required stuff. The lms daemon is installed by the script as /usr/sbin/lms. Note, that the ACUConfig utility segfaults, when it encounters tun or ppp interfaces. Furthermore it won't work with libstdc++ from gcc 4.8 (libstdc++ from gcc 4.4.6 works for me) and requires the .config directory in your home directory to exist and to be writable.
To verify that you are ready to configure AMT, issue /usr/sbin/lms to start the lms daemon. If lms is listening on least ports 623 and 16992 you're fine and you can autostart lms during boot according to the distro you're using. If not, you will have to look at the syslog messages lms generates to find out what's wrong.
If you're going to use the configuration files supplied in the support directory of the amtinstall package the default password used is Pa$$w0rd which is fine for a german keyboard layout as the keys required are identical to the US keyboard layout. You can change the passwords lateron using ACUConfig for the admin user and via the MEBx BIOS for AMT BIOS access.
ACUConfig requires AMT to generate an UUID. I couldn't find any consistent way to nudge AMT into doing this. And if there's no GUID ACUConfig will refuse to do a real configuration. The most probable way to get an UUID, however, was to try a client configuration which somehow succeeds, if necessary enable AMT networking in the AMT BIOS and then do a full unconfiguration. You will have to experiment. Any created UUID seems to be stored in some flash memory so once it is generated it survives AMT unconfiguration and CMOS data reset. And as such I can't retry to document a consistent way to get this right. You can use the amtclient.sh script provided in the support directory of the amtinstall package to do a client configuration. The amtunconfig.sh script does an unconfiguration and the amtstatus.sh shows the current configuration status.
Note that you don't want to have an AMT system configured in client mode. Basically this is a restricted mode where you can't do the things you will be really interested in. Client mode is only helpful to nudge AMT into generating a UUID. What you do really want is AMT configured in admin mode which is the unrestricted mode.
So by now you should have an unconfigured AMT system with a configured UUID. Time to get serious. Grab an USB stick and format it with FAT32 the way "the other OS" does, i.e. no partitions. Mount it and copy the Setup.bin file from the support directory of the amtinstall package to the root directory of the stick. Unmount, remove the stick and reboot the target host with the stick inserted (the stick should be the only USB storage medium inserted). The target host BIOS should now ask you, if you want to provision AMT. Say yes (again: US keyboard layout). Now you do have an AMT system configured in admin mode which you can fully configure using ACUConfig.
Then you need to edit config.xml.in and network.xml.in to suit your needs. Don't mess with the UTF-8 character in network.xml.in, just leave it as it is. Note that these two files are plaintext files which will be encrypted to config.xml and network.xml as ACUConfig doesn't seem to like unencrypted configuration files. The amtconfig.sh script in the support directory of the amtinstall package will do this for you and it will feed the encrypted files as well as the encryption password to ACUConfig. Change the users passwords to the ones you like with the following restrictions: any password mut have a length of 8 to 32 characters with the exception of the RFB password (VNC on port 5900) which must have a length of exactly 8 characters. Any password must contain at least one uppercase letter, one lowercase letter, one number and one special character (e.g. "$"). The underscore character counts as a letter (I don't know if uppercase or lowercase). The admin user name is always admin. You can remove the additional users from the configuration or add more users, this depends on your preferences. Every user has attached an AccessPermissionType value which seems to be 0 for local only access, 1 for remote access and 2 for local and remote access. Furthermore every user has RealmId values which are actually permissions granted to the user. The mapping to numeric values can be found here. See the AMT documentation for further reading.
If you want to create such xml files on "the other OS" using the SCS SDK be aware that these will not work out of the box on Linux using ACUConfig. The reason is that the SCS tools are for AMT 9 whereas the Linux ACUConfig is from AMT 7 times as it seems. Unfortunately you can't directly adapt these configuration files as they are encrypted. Well, you did encrypt them, thus you know the key used to encrypt. And there's decrypt.sh and encrypt.sh in the support directory of the amtinstall package which allow you to decrypt or encrypt these xml files when you provide the proper key. Compare such a decrypted xml file to the provided config.xml.in to find out what you have to modify to use the file with Linux ACUConfig.
So by now you got your configuration ready. Then run amtconfig.sh in the support directory of the amtinstall package. If everything goes well you now have a fully configured AMT in admin mode you can work with.
AMT Web UI
This is easy. Just access http://localhost:16992/ on the AMT host or access http://<amt-ip-as-configured>:16992/ from a remote system. Login as admin with the password you did configure. Complete your network setup, especially do IPv6 setup if required. As a hint if you want to change the Shared FQDN setting on the System Name Settings page you will first have to clear the Domain name field, then change the checkbox setting and then set the Domain name field to the previous value. At least AMT 8 seems to have this bug.
Probably you will want to clear the logs and stop logging. Nothing important gets logged anyway unless you are an enterprise level user.
You should modify user accounts only through ACUConfig xml files which allow fine grained permissions. The web ui doesn't allow for that.
Except for network configuration the web ui isn't of too much use. Users are better configured using ACUConfig, power control is better done via ws-management (see below) and thus through a shell script.
AMT WS-Management from Linux
Bloat. Sorry, but that's what ws-management is. It seems that "enterprise" means "has to look complicated, has to be complicated, requires a high level vendor supplied api" even when it could have been done in a more simpler and sane way. 'nuff said.
You will need the wsamt utility to control AMT. This is simply due to the fact that the AMT web interface is utterly incomplete, seems to change from AMT version to AMT version as support queries on the web show and is simply designed for human instead of script access. Even then the wsamt utility is not able to do some simple things like enabling/disabling IPv6 as the required ws-management request just can't be built using the openwsman command line interface as the request is just too complex. Still, lots of interesting things can be done using the wsamt utility (for value retrieval just leave out the new value):
rfbpass <password>           set rfb password
rfbport on|off               enable/disable rfb port
rfbservice on|off            enable/disable rfb service
redirport on|off             enable/disable SOL/IDER port
webui on|off                 enable/disable web logon
ping on|off                  enable/disable AMT ping replies
idle <minutes>               set AMT idle->sleep time (powersave)
timeout <minutes>            set AMT session timeout (0=off)
optin on|off                 enable/disable redirection opt-in
power <state>                set new power state (2=On,5=Power Cycle,8=Off,10=Reset)
rmcp on|off                  enable/disable rmcp ping response
dhcpv6 <seconds>             set dhcpv6 timeout (0=never)
wsman on|off                 enable/disable ws-management only mode
ider on|off                  enable ider, disable sol/disable sol+ider
sol on|off                   enable sol, disable ider/disable sol+ider
solider on|off               enable/disable sol and ider
boot default|cddvd|hdd|diag| set the source for the next boot
outgoingv6 on|off            prefer ipv6 on outgoing connections
amtnet on|off                enable/disable amt via network (amt v9+)
     pxe|idercd|iderfd|sol|
     bios|idersolcd|
     idersolfd|biossol
userlst                      list users with access mode and realms
usermod user on|off          enable/disable user
userchg user password        change password, access mode and realms
        access realm ...
useradd user password        create user with password, access mode
        access realm ...     and realms
userdel user                 delete user
addca cacertfile             add ca cert as given in pem ca cert file
delca cacertfile             remove ca cert as given in pem ca cert file
addcert certfile             add cert as given in pem cert file
addkey keyfile               add key as given in pem key file
delcertkey certfile          remove cert and key referenced by cert file
mktlsctx certfile            create tls ctx for cert ref'd by certfile
rmtlsctx                     delete tls context
lclcert on|off               require client cert on lms connection
netcert on|off               require client cert on network connection
lclboth on|off               allow tls and plaintext connects via lms
netboth on|off               allow tls and plaintext connects via net
lcltls on|off                enable/disable tls for lms
nettls on|off                enable/disable tls for network
commit                       activate cert/key/tls changes
timesync                     synchronize AMT clock with local system
listall                      as it says :-)
listepr                      listall with endpoint references
If something is missing out feel free to add it to the utility. Have a look at the AMT documentation for what is available. To invoke the utility, either use the fully qualified path or set your PATH environment properly. The wsamt utility accepts the following command line options (the environment variables specified can be used alternatively):
Option            Environment Variable         Description
-v                                             verbose mode (not for value retrieval)
-h <host>         WSMAN_HOST                   the host to be connected, default is localhost
-P <port>         WSMAN_PORT                   the port to be accessed, default is 623 (664 for tls)
-u <user>         WSMAN_USER                   the login user, no default
-p <password>     WSMAN_PASS                   the password for the user, no default
-c <cacert>                                    path to pem encoded cacert file, enables tls usage
You can find the wsamt utility including a script that builds and installs openwsman including required patches as well as wsamt in the downloads section.
AMT Serial Console
Basically this is easy. Use amtterm. However, the latest released version is a bit old and the git version does contain a fix for the darn unknown 0x29 message abort. Still, amtterm is missing digest authentication and sends username and password as cleartext over the net. Not nice. You can find, however, in the downloads section the required patches for amtterm-1.3 to update it to current git and then to add digest authentication as well as SSL/TLS support (optional, either Openssl or GnuTLS based). The archive includes build scripts which download amtterm-1.3, apply the necessary patches and then build amtterm according to the SSL/TLS version selected.
AMT IDE-R from Linux to Linux
IDE-R means IDE Remote. In practice you will find a virtual IDE controller on the remote target that provides for a removable disk and a CD/DVD device. There exists a binary only library for Linux which is supposed to allow use of that feature. I don't like binary only. And the library is utterly broken. The removable disk must be an 240MB LS-120 image, else the library fails (try to use a 1.44MB floppy image and then dd from this image on the target host). And this is nowhere documented. You cannot use CD/DVD images with the Linux version of this library but the version of the library for "the other OS" allows this. You cannot access DVDs with the Linux library. The version for "the other OS" allows it.
Thus I started up tcpdump again and did a little analyzing. The IDE-R protocol is fairly simple. Basically you open a session, enable/disable IDE registers on the target host, do a little heartbeat stuff and then you just process 6 and10 byte SCSI commands sent by the target host (I guess that 12 byte commands should be possible). Send the command results back to the target host and you're done. This lead to a complete open source example implementation of the IDE-R stuff which you can find in the downloads section. Note that the implementation still contains quite some hard coded values the purpose of which is unknown. I did analyze just enough to get things working, including booting from an ISO CD image.
You can compile the IDE-R implementation with optional SSL/TLS support for encrypted AMT connections using either Openssl or GnuTLS. The actual utility you can use is named idertool, the included demo utility is for testing and development only.
Note that IDE-R is slow. It seems to reach transfer rates of up to 2MB/s and not a single bit faster. Thus you shouldn't use it for large data transfers unless you prefer to consume lots of coffee.
AMT VNC from Linux to Linux
Now you want to access the host though AMT VNC. This looks easy and fine on the first glance, but then you start to wonder...
Well, AMT VNC is a beast. It seems that AMT is designed to be as unusable as possible. First of all it can use port 5900 but then you should try routing port 5900 to some remote service through the AMT NIC. Good luck, AMT just grabs all packets to port 5900, regardless of the destination IP. So you have to use port 16994 which, however, requires AMT authentication after which the regular VNC RFB communication commences. Then the AMT VNC server uses RGB565 in a RGB888 world which means that most VNC viewers will choke (actually they do request RGB888 from AMT and AMT then just closes the connection) or fall back to BGR233 which means a total of 256 colors. Doh. Furthermore AMT presents itself to the host as an USB Keyboard and mouse controller when it comes to input devices. So far, so good. But: the keyboard controller is a PC104 US keyboard device and this is not changeable. There seems to be a VNC extension that allows to directly send the usb keys through this device. But this is only for RFB 4 which, however, is not publically specified, so you would be required to use a so called VNC Viewer Plus which is for "the other OS" only and which requires a license that costs "only" $99. Fortunately after testing around the AMT usb keyboard controller supports some additional japanese keys not required in most parts of the world. So we can get a fully mapped keyboard with some help. Now lets look at the following graphic and see, which parts are commonly available and which parts are not:
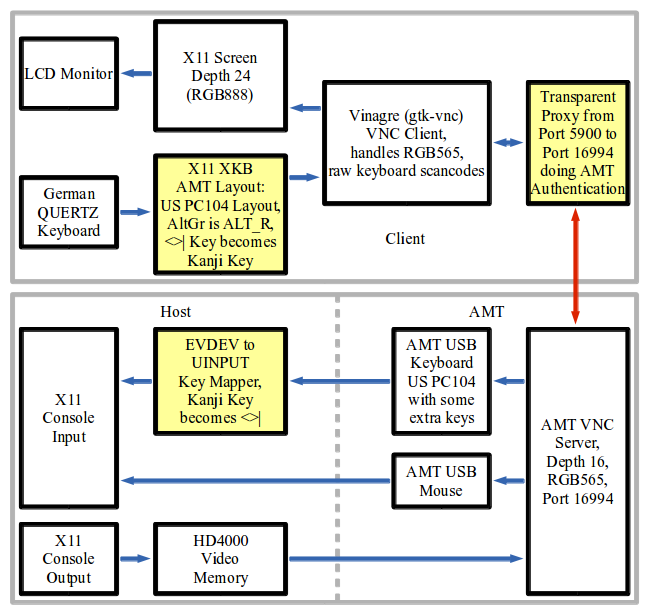
The white boxes are the standard parts readily available. The yellow boxes are what is required to get things to work. Lets look at the authentication part first. You have to go through port 16994 to avoid the problems with port 5900 (the port being grabbed by AMT and never seen by the host). Now, port 16994 means AMT redirection service and thus digest authentication. Fortunately the digest authentication is RFC compliant and the encapsulation can be easily decoded by looking at the tcpdump output of an redirection session authentication.
Thus, a transparent proxy is required that grabs local output to port 5900, detect via a configuration file if the target of the connection is actually AMT and in this case redirect the connection to port 16994 and handle authentication. The VNC viewer connection to port 5900 doesn't ever see anything of the redirection to port 16994 and, as authentication is already handled by the transparent proxy, does not need to handle any authentication itself in the AMT case.
The next blow is that quite some VNC viewers then expect to be able to send the VNC server a RGB888 encoding request and be done. Then these viewers are done. Literally. The AMT VNC server just closes the connection. Typically these VNC viewers have an BGR233 option for 8 bit colors. This works. However, have a look at what a mapping of true color to 256 colors looks like. Arrrgh. Note that the same company that wants to sell you their VNC Viewer Plus has a "free" (binary only is not free in my opinion) VNC Viewer for Linux. Only that this looks like early 1990s and does, you guess what, BGR233 only!
Thus one needs a VNC viewer that accepts the color depth settings the AMT VNC server presents which is RGB565 or a color depth of 16 bits. All VNC clients I know of that can handle RGB565 with local X11 visuals of 24 bits or more are based on the gtk-vnc library.
The next fun is with the keyboard layout. You will find out more sooner than later that AMT VNC for non US keyboard users seemingly was never really planned by the AMT designers. Come on, we live in a modern world and UTF8 has been around for quite some time! So, let's do some thinking on how to overcome this problem:
First of all, we can try to use a US keyboard layout on the VNC client. So far so good. This maps most of our standard keys properly through the AMT USB keyboard controller and we can use a QWERTZ layout on the host. Trouble starts when one has to use AltGr. But on the host everything is sent through an AMT USB keyboard controller. So on the VNC client we need an US keyboard layout with the AltGr key not mapped to ISO_Level3_Shift but to Alt_R, the host on the other side will handle the Alt_R to AltGr mapping then automatically. Bingo, nearly everything works now through VNC.
But: what has happend locally? Strange things are going on. The Alt_L key is broken. xmodmap shows an additional ISO_Level3_Shift for the mod5 modifier which actually should be Alt_R. Now, if one doesn't add Alt_R to mod5, Alt_L works but all the AltGr keys are prefixed by an ESC character even though xev doesn't show this. Subtle bugs of the X11 XKB extension it seems. Understandable because who in the right state of his mind needs a real Alt_R key today? Ok, let's continue the insane way and set Alt_R to mod5 in the keymap. After the keymap is loaded just use xmodmap to remove Alt_R from mod5, even if it is not shown there. Now every selectable keyboard layout works. To do this removal automatically a daemon is required that is started at the beginning of your X11 session and which fixes up the Alt_R stuff everytime it is required. As it turns out it is not that difficult to code such a daemon.
So we got 104 keys working properly. That is, if we use a VNC client with proper key handling. Again, only VNC clients based on the gtk-vnc library seem to do the right thing. Personally I know of two such clients, namely gtkvncviewer and vinagre. Sadly gtkvncviewer requires access to the Gnome keyring stuff and expects your personal vault to be already open. Thus it is usable only in Gnome environments. As the result the only client which I know of as usable and which seems to work with a variety of window managers seems to be vinagre. Ok everything set, but: where's the darn "<>|" key?
Remember, the gods decided for an 104 key keyboard. And the "<>|" key is key number 105. Ok, some testing comes to help. I did sent lots of X11 keycodes through vinagre and checked what the AMT usb keyboard controller did send to the host (if it did send anything). It seems, some of the AMT developers must have been from Japan as the controller does send some japanese keys. That is, where we can complete the keyboard mapping. We map the "<>|" key to the Kanji key, which the AMT usb keyboard controller humbly sends to the host. On the host we use a mapper daemon started by udev for the AMT usb keyboard which opens the device exclusively and passes on all events through a virtual UINPUT usb keyboard except for the Kanji key, which gets mapped to the "<>|" key. Now we have got all 105 keys working. Wasn't that easy?
You should, using the appropriate tools of your preferred session manager on the client, set up at least two keyboard layouts, one being your native and default layout and the other being the AMT layout. Define a hotkey combination to switch between the layouts, personally I prefer Alt-CapsLock. Then set automatic keyboard layout switching to be window based. This results in your regular keyboard layout all over the place except for the vinagre AMT window(s) which get the AMT layout. A surefire way to prevent you from going mad when switching between windows. And, to be able to do this, you first will have to modify some additional X11 XKB configuration files for the AMT keyboard layout to show up in the layout selection of your favorite keyboard manager. Which you will have to do every time X11 XKB stuff gets updated. Hmmm...
Now as you know what is required you need to know where all of the additional parts can be found. Don't worry, they're right here in the downloads section. The amtmapper archive contains everything required to set up keyboard mapping on the VNC client and on the host. The amtproxy archive contains the transparent proying and authentication daemon which as an addition to the requirements stated above is able to make SSL/TLS connections to port 16995 if compiled with Openssl or GnuTLS support. Note that both archives are for Linux only and that the amtproxy requires at least kernel 3.7 or a later version. This shouldn't be a problem as of the time of writing the current kernel is 3.13, except maybe for those long term enterprise distro users which may even be stuck with a 2.6.18 kernel...
AMT during System Boot
Again, this is fun. Don't expect firing up vinagre or amtterm and issuing "reboot" on the target host will work. The AMT connections may or may not survive the reboot but for sure the will not work during system boot and be disconnected by AMT lateron. At least this happens with the AMT implementation I'm working with. The surefire way to get AMT access during boot (this includes BIOS access via vinagre) is:
- Poweroff the remote host, either soft by issuing a "poweroff" command or by a hard poweroff (you can use AMT for this)
- Poweron the remote host (you can use AMT for this)
- Wait for about two seconds and then wait until the remote host is ping-able (you can use pingwait utility available in the downloads section for this).
- Start vinagre or amtterm as required.
The pingwait archive available in the downloads section contains a sample script for this sequence. It is called amtconsole and requires vinagre, gamt (amtterm), wsamt and idertool (both available in the downloads section).
If the BIOS wait is too short there may be help in form of the efibootmgr tool (this requires that you do an UEFI boot). Issue "efibootmgr -t 15" from the booted OS on the remote host and try again. The BIOS should now wait for 15 seconds until it starts loading the boot manager.
A hint for amtproxy: if you need to access a system during boot that serves DNS you need to access this system by IP. Thus it must be entered by IP in the amtproxy configuration file. Due to the way amtproxy processes the configuration file the IP entries must be the last entries of the configuration file.
AMT and SSL/TLS
Everyone in their sane state of mind would expect to be at least able to use the web ui to enable use of a self signed cert for small scale use. Well, AMT is insane. you have to use ws-management calls for everything and and you need to have a some knowledge how certificates work to understand what the AMT designers decided to come up with. Even then, better not think of using your already created CA and infrastructure. At least in my case AMT 8 didn't like my CA certificate at all so I did need to build a secondary certificate infrastructure for AMT only. The amtcerts package in the downloads section provides everything you need to create your CA certificate as well as the server certificates for AMT (Openssl required).
Anyway, I first have to describe, how the AMT certificate handling design looks like. First of all, you need a CA certificate, all intermediate CA certificates (if there are any) and then a client certificate and key signed by the (intermediate) CA. You can't use self signed certificates. This, however, is no problem as you can run your own CA which does not cost yearly fees and which will allow you to generate certificates lasting for e.g. more than 20 years (yes, your home network or test center will probably not need regular certificate replacements). Then you have to associate your server certificate with SSL/TLS usage. Finally you need to set a few options regarding SSL/TLS for the local access vial lms as well as for the access via network, followed by SSL/TLS enablement for lms and network. In between you need to commit your changes at certain stages. If you created your certificate stuff properly you can then use the wsamt utility to configure everything required for SSL/TLS:
- install your CA certificate using the addca command
- install your server certifikate using the addcert command
- install the key for your server certificate using the addkey command (the key must not be passphrase protected)
- associate your server certificate with SSL/TLS using the mktlsctx command
- commit changes using the commit command
- disable client certificate enforcement (you have not created/installed such certificates) for lms and network using the lclcert and netcert commands
- commit changes using the commit command
- enable plain text access for lms and network using the lclboth and netboth command
- commit changes using the commit command
- enable tls for the network using the nettls command
- commit changes using the commit command
- for AMT 8 and higher you can now test via network access if SSL/TLS as well as unencrypted access is working and if not you can use the lms plaintext interface to fixup things
- enable tls for lms using the lcltls command
- commit changes using the commit command
- check that SSL/TLS as well as unencrypted access is working properly for lms access as well as network access
- if you only want encrypted access (this includes the whole redirection stuff!) make sure that the time of the AMT clock is properly set by periodically using the timesync command and disable unencrypted access (lclboth, netboth and commit)
Now, wasn't that easy? And that's only a high level view. You don't want to know what needs to be done in the wsamt utility. And you don't want to have a look at what's generated and transferred by the openwsman stuff. Curious? Have a look and cry.
AMT Problems
The following is a list of problems I did encounter during my use of AMT. There may by more to it, releases of AMT other than version 8 (the only version I do have access to) may handle things differently. Your mileage may vary.
- VLAN
It seems that AMT did once support VLAN tags. Then Intel did remove this "feature". Oh well. This means that if you're running a target host that is configured to use only tagged VLANs you have to do a switch configuration that adds an untagged VLAN on the target host port and then you need a gateway system that proxies requests to the AMT device via that VLAN. And even then VLAN support was seemingly only removed from the configuration. If AMT grabs all traffic destined for a port it grabs all tagged packets, too. Cute, isn't it?
- Routing
AMT has a seemingly "special" feature that could be named "an AMT system has to be an end user system, you must not use it for routing". That's at least valid for the redirection and the VNC ports. In case of the VNC port (5900) all traffic destined for a foreign destination is grabbed by AMT without any respect to the target IP, if the VNC port is enabled in AMT. For the redirection port (16994) the same is true, but only for IPv6. Needs further testing for all possibly affected ports (623, 664, 5900, 16992, 16993, 16994, 16995)